Honeywell Warm Mist Humidifier Manual: A Comprehensive Guide
This manual provides detailed instructions for operating‚ maintaining‚ and troubleshooting your Honeywell warm mist humidifier‚ ensuring a comfortable and healthy indoor environment.
Honeywell warm mist humidifiers offer a traditional approach to increasing indoor humidity‚ providing soothing relief from dry air. These humidifiers gently heat water‚ releasing a warm‚ moist vapor into the room‚ which can help alleviate congestion and dryness.
Models like the HWM845 series and the Vicks V790 (a Honeywell partnership) are designed for ease of use and effective humidification. Understanding your specific model’s features‚ as outlined in this manual‚ is crucial for optimal performance and longevity; Regular cleaning‚ as detailed within‚ is also essential.
Understanding the Benefits of Warm Mist Humidification
Warm mist humidification offers several advantages‚ particularly for those seeking relief from cold and flu symptoms. The heated moisture can help soothe irritated nasal passages and loosen congestion‚ promoting easier breathing.
Unlike cool mist humidifiers‚ warm mist models visibly release steam‚ offering a comforting sensation. Maintaining ideal humidity levels‚ as discussed in this manual‚ can also benefit skin health and reduce static electricity. However‚ remember safety precautions regarding hot water and surfaces are vital.
Key Components and Parts Identification
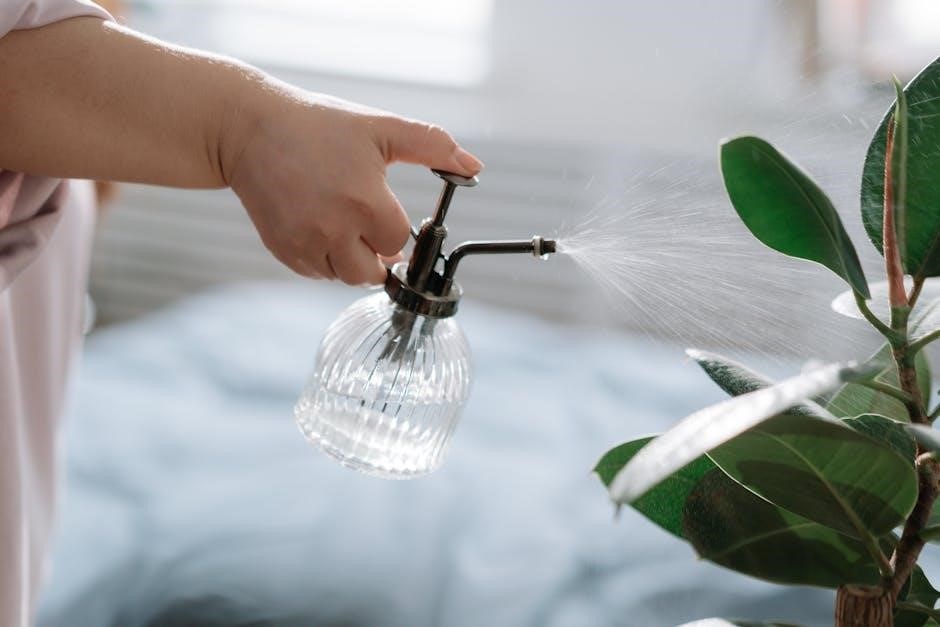
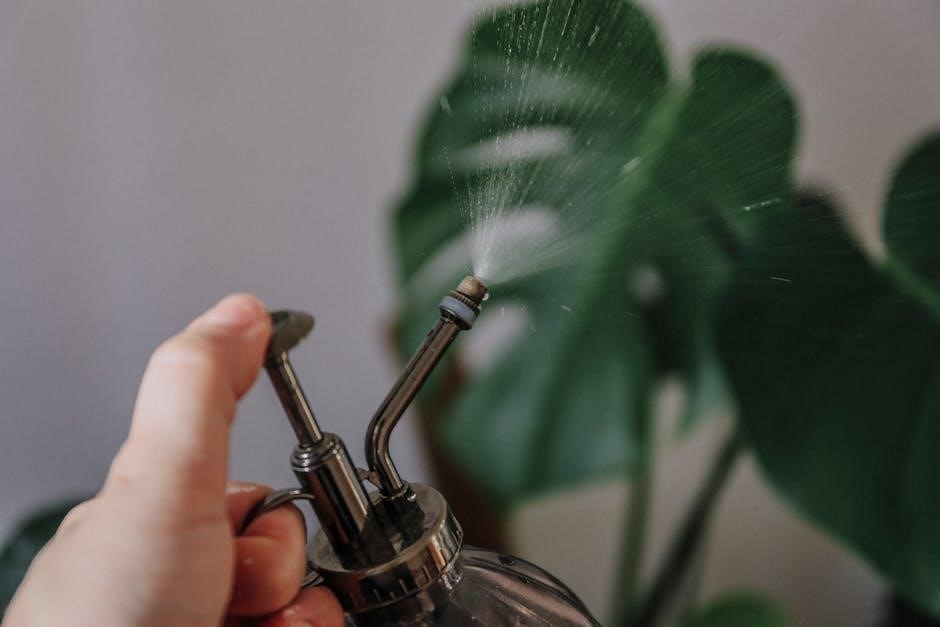
This section details the humidifier’s essential parts: the base‚ water tank‚ heating element‚ vaporizer‚ and control panel‚ for proper understanding and maintenance.
Humidifier Base and Water Tank
The humidifier base securely houses the heating element and internal mechanisms‚ providing a stable foundation for operation. The water tank‚ typically made of durable plastic‚ holds the water supply for humidification.
Ensure the tank is properly seated on the base to prevent leaks. Regularly inspect both components for cracks or damage. Water drains from the tank when the plunger is engaged‚ so handle with care. Always refer to the manual for specific tank capacity and filling guidelines for your model.
Heating Element and Vaporizer
The heating element within the humidifier warms the water to create steam. The vaporizer then releases this warm mist into the air‚ increasing humidity levels.
Mineral deposits can accumulate on the heating element‚ reducing efficiency and potentially causing damage. Regular descaling‚ as outlined in the maintenance section‚ is crucial. Never operate the humidifier without sufficient water‚ as this can burn out the element. Always unplug before cleaning these sensitive parts.
Control Panel Overview
The control panel features power buttons‚ humidity level settings‚ and a timer function for customized operation. Some models include a night light control. Power turns the unit on/off. Humidity levels adjust mist output – low‚ medium‚ or high.
The timer allows pre-set run times. Refer to your specific model’s diagram for button locations. Understanding these controls ensures optimal performance and personalized comfort. Always consult the manual for detailed explanations of each feature.

Setting Up Your Honeywell Warm Mist Humidifier
Initial setup involves unpacking‚ filling the water tank‚ and connecting to power. Follow these steps carefully for safe and efficient operation of your humidifier.
Initial Setup and Unpacking
Carefully remove the humidifier and all packaging materials. Retain this instruction manual for future reference. Inspect the unit for any visible damage. Ensure all parts are present‚ including the base‚ water tank‚ and any included accessories. Remove any protective films or stickers. Keep the packaging for potential warranty claims or returns. Before first use‚ wipe down the exterior with a damp cloth to remove dust or debris accumulated during shipping.
Filling the Water Tank
Detach the water tank from the humidifier base. Locate the tank opening and carefully fill with cool‚ distilled water. Avoid using tap water‚ as mineral deposits can accumulate. Do not overfill past the maximum fill line indicated on the tank. Securely reattach the water tank to the base‚ ensuring a proper seal. Regularly cleaning the tank prevents bacteria and mold growth‚ maintaining optimal performance.
Powering On and Selecting Settings
Plug the humidifier into a grounded electrical outlet. Press the power button to initiate operation. Utilize the control panel to adjust humidity levels‚ choosing from low‚ medium‚ or high settings. Explore the timer function for automated operation‚ setting desired run times. Some models feature a night light; activate it as needed. Always refer to your specific model’s instructions for detailed setting options.
Operating Instructions
Follow these guidelines to effectively use your humidifier‚ adjusting settings for optimal comfort and utilizing features like timers and night lights.
Adjusting Humidity Levels
Maintaining ideal humidity is crucial for comfort and health. Utilize the control panel to select your desired output level‚ starting with a lower setting and increasing as needed.
Monitor the room’s humidity with a hygrometer to achieve the recommended 30-50% range. If condensation forms on windows or walls‚ reduce the humidity setting to prevent mold growth.
Remember‚ individual preferences and room size influence optimal levels; adjust accordingly for a healthier‚ more comfortable environment.
Using the Timer Function
The timer function allows for convenient‚ automated operation of your humidifier. Press the timer button on the control panel to activate this feature.
Select your desired run time – typically options include 2‚ 4‚ or 8 hours‚ though specific models may vary. The humidifier will automatically shut off once the set time elapses.
Utilizing the timer conserves energy and ensures the humidifier operates only when needed‚ providing consistent comfort without constant monitoring.
Night Light Feature (if applicable)
Certain Honeywell warm mist humidifier models include a convenient night light feature‚ offering a soft glow for added comfort in darkened rooms.
To activate the night light‚ locate the dedicated button on the control panel – it’s often indicated by a moon or lightbulb symbol. Pressing this button will illuminate the night light.
The night light is designed to be subtle and non-disruptive‚ providing gentle illumination without interfering with sleep. It can typically be turned off using the same button.

Maintenance and Cleaning
Regular cleaning is crucial for optimal performance and preventing mineral buildup; follow the instructions carefully to maintain your humidifier’s longevity.
Regular Cleaning Schedule
To ensure optimal performance and prevent the growth of mold and bacteria‚ a consistent cleaning schedule is essential. Empty and thoroughly dry the water tank daily to inhibit bacterial growth.
Perform a more detailed cleaning at least once a week‚ utilizing white vinegar and water to descale the humidifier. Rinse all components thoroughly after cleaning‚ ensuring no vinegar residue remains. Inspect the humidifier regularly for any signs of mineral buildup or discoloration‚ addressing them promptly.
Descaling Procedures
Mineral deposits‚ or scale‚ can accumulate within your humidifier‚ reducing its efficiency. To descale‚ unplug the unit and empty any remaining water. Mix equal parts white vinegar and water‚ then fill the tank with this solution.
Allow the mixture to sit for at least one hour‚ or longer for heavy buildup. After soaking‚ empty the tank and rinse thoroughly with clean water until the vinegar scent is gone. Repeat if necessary‚ ensuring all scale is removed.
Cleaning the Water Tank
Regularly cleaning the water tank prevents mold and bacteria growth. Unplug the humidifier and empty any remaining water. Wash the tank with mild soap and warm water‚ using a soft cloth or sponge. Rinse thoroughly to remove all soap residue.
For stubborn stains or buildup‚ a solution of water and white vinegar can be used. Ensure the tank is completely dry before reassembling and refilling. Cleaning should be done at least weekly‚ or more often with frequent use.

Troubleshooting Common Issues
This section addresses typical problems like the humidifier not powering on‚ low mist output‚ or unusual noises‚ offering solutions for optimal performance.
Humidifier Not Turning On
If your Honeywell warm mist humidifier fails to power on‚ first verify the unit is securely plugged into a functioning electrical outlet. Check the power cord for any visible damage or fraying‚ and if found‚ discontinue use immediately. Ensure the water tank is properly seated on the base‚ as a safety mechanism prevents operation without it.
Additionally‚ confirm that the internal thermal fuse hasn’t tripped – this can occur due to overheating or mineral buildup. If these steps don’t resolve the issue‚ consult the warranty information or contact Honeywell support for assistance.
Low Mist Output
Experiencing reduced mist output from your Honeywell humidifier? The primary cause is often mineral buildup within the heating element or vaporizer. Regular descaling‚ as outlined in the maintenance section‚ is crucial. Ensure the water tank is filled to the appropriate level; insufficient water restricts vapor production.
Also‚ verify that the mist outlet isn’t obstructed by dust or debris. If the issue persists after cleaning and proper filling‚ consider contacting Honeywell customer support for further troubleshooting guidance.
Unusual Noises
Hearing strange sounds from your Honeywell humidifier? Gurgling often indicates air trapped within the system; gently shaking the unit may resolve this. Clicking sounds can stem from the thermostat cycling on and off‚ a normal operation. However‚ loud or persistent noises warrant investigation.
Check for obstructions in the water tank or fan area. If the noise continues‚ discontinue use and contact Honeywell support‚ as it could indicate a mechanical issue requiring professional attention.
Safety Precautions
Always prioritize safety! Use clean water‚ avoid outdoor operation‚ and regularly clean the humidifier to prevent mold and bacteria growth.
Electrical Safety
To ensure electrical safety‚ always verify the voltage matches the humidifier’s requirements before plugging it in. Never operate with a damaged cord or plug; replace immediately. Avoid using extension cords.
Do not pull the cord to disconnect; grasp the plug instead. Ensure the humidifier is unplugged during filling‚ cleaning‚ and maintenance. Never immerse the base in water or other liquids. If the humidifier malfunctions‚ disconnect it from the power source and consult a qualified technician.
Water Quality and Usage
Utilize distilled or demineralized water to minimize mineral buildup within the humidifier‚ extending its lifespan and maintaining optimal performance. Tap water can leave scale deposits‚ requiring more frequent cleaning.
Regularly change the water‚ even if not depleted‚ to prevent bacterial growth. Do not add any medications‚ essential oils‚ or other additives to the water tank‚ as they may damage the unit or release harmful substances.
Preventing Mold and Bacteria Growth
Consistent cleaning is crucial to inhibit mold and bacteria. Empty the water tank daily and thoroughly dry all components before storage. Disinfect the tank regularly using a diluted bleach solution‚ following the cleaning instructions.
Avoid leaving stagnant water‚ which encourages microbial growth. Ensure proper ventilation in the room and consider using a humidifier cleaner to further reduce the risk of contamination.

Warranty Information
This humidifier is covered by a limited warranty against defects in materials and workmanship. Review the warranty details for coverage duration and claim procedures.
Coverage Details
The warranty typically covers defects in materials and workmanship for a specified period‚ often one year from the date of purchase. This coverage includes repair or replacement of defective parts‚ at Honeywell’s discretion. Damage resulting from misuse‚ accidents‚ or unauthorized repairs are excluded. Proof of purchase is required for all warranty claims. The warranty does not cover normal wear and tear‚ or mineral buildup requiring descaling. Carefully review the complete warranty document for specific terms and conditions.
How to Claim Warranty
To initiate a warranty claim‚ contact Honeywell’s customer service department with your model number and proof of purchase. You may be required to provide a detailed description of the defect and potentially return the humidifier for inspection. Warranty service is typically performed by authorized service centers. Retain your original sales receipt as evidence of the purchase date. Shipping costs for warranty returns may be the responsibility of the consumer.

Model-Specific Instructions
Refer to the following sections for detailed guidance tailored to your specific Honeywell warm mist humidifier model‚ including the HWM845 and HCM350 series.
Honeywell HWM845 Series
The HWM845 series warm mist humidifier offers adjustable humidity levels for personalized comfort. Ensure proper setup by following the unpacking and filling instructions carefully. Regularly clean the humidifier‚ paying close attention to descaling procedures to prevent mineral buildup.
Adjust settings using the control panel‚ and utilize the timer function for convenient operation. Always prioritize electrical safety and maintain optimal water quality. Refer to the full manual for detailed troubleshooting and warranty information specific to this model.
Honeywell HCM350 Series
The Honeywell HCM350 humidifier is designed for ease of use and efficient humidification. Begin with initial setup‚ carefully unpacking and positioning the unit. Filling the water tank is straightforward‚ but always ensure proper water quality.
Power on and select your desired settings via the intuitive control panel. Regular cleaning‚ as outlined in the manual‚ is crucial for optimal performance and longevity. Refer to the complete guide for detailed troubleshooting steps and warranty details.
Vicks V790 Germ-Free Warm Mist Humidifier (Honeywell Partnership)
The Vicks V790‚ a Honeywell partnership product‚ offers germ-free warm mist for enhanced comfort. Carefully read all safety precautions before initial use. Proper setup involves unpacking and filling the water tank‚ ensuring it’s clean to prevent bacterial growth.
Operation is simple‚ utilizing the control panel to adjust settings. Regular cleaning‚ including descaling‚ is vital for maintaining germ-free performance. Consult the full manual for troubleshooting and warranty information regarding this specific model.

Understanding Humidity Levels
Maintaining ideal indoor humidity‚ typically between 30-50%‚ is crucial for comfort and health. Monitoring levels ensures optimal humidifier performance and well-being.
Ideal Indoor Humidity
Achieving the right humidity level is vital for a comfortable and healthy home environment. Experts generally recommend maintaining an indoor humidity between 30% and 50%. Below 30%‚ air can become too dry‚ leading to irritated skin‚ dry sinuses‚ and increased susceptibility to colds.
Conversely‚ humidity above 50% can encourage mold and bacteria growth‚ potentially exacerbating allergies and respiratory issues. Honeywell warm mist humidifiers help you achieve and maintain this optimal range‚ providing relief from dry air while preventing excessive moisture buildup.
Monitoring Humidity
Accurately tracking indoor humidity levels ensures optimal performance from your Honeywell warm mist humidifier. Utilize a hygrometer‚ a device specifically designed to measure humidity‚ for precise readings. These are readily available at most hardware and home goods stores.
Regularly check the hygrometer in various rooms to identify areas needing adjustment. Observe for condensation on windows or walls‚ which indicates excessive humidity. Adjust your humidifier’s settings accordingly to maintain the recommended 30-50% range for a healthier home.

Replacing Parts
Ensure optimal performance by regularly replacing humidifier parts‚ such as filters if applicable‚ and ordering replacements directly from Honeywell or authorized retailers.
Finding Replacement Filters (if applicable)
Determining filter needs depends on your specific Honeywell warm mist humidifier model; some models don’t utilize filters. Check your humidifier’s documentation to confirm if a filter is required. Replacement filters are readily available through the Honeywell website‚ major retailers like Amazon‚ and appliance parts stores. When searching‚ have your model number handy for accurate matching. Regularly replacing filters—if your model uses them—maintains optimal air quality and humidifier efficiency‚ preventing mineral buildup and ensuring clean‚ healthy mist output;
Ordering Replacement Parts
Genuine Honeywell replacement parts ensure optimal performance and longevity of your humidifier. You can conveniently order parts directly from the Honeywell website‚ utilizing your model number for accurate selection. Alternatively‚ major retailers like Amazon and specialized appliance parts suppliers stock common components. Always verify compatibility before purchasing. Maintaining a supply of essential parts‚ such as the heating element or water tank‚ minimizes downtime and keeps your humidifier functioning efficiently.